How to Design a Waterfall
<< prev: 1.5 Choosing a Size and Depth : next: 1.7 Water Garden Shelves and Plants >>
Waterfalls are one of our favorite features of a pond. Although they are not absolutely necessary, we like to incorporate them into our designs whenever possible.
Here are a few reasons we like waterfalls:
- Waterfalls look and sound great when built properly.
- Waterfalls help to aerate the water.
- Waterfalls allow the use of a waterfall filter, which is a great way to simplify and disguise the filtration system.
- After the water goes through the filtration system, it needs to be returned to the pond some way. Why not do this with a great looking waterfall?
Waterfall Placement
There’s no point in building a waterfall if it’s hiding behind a tree or facing the wrong direction, so you can’t see it from your main viewing location. It may seem fairly obvious, but step one is to make the waterfall face your viewing location, which likely means placing it at the back, or at one end of the pond.
Size
As a starting point, we recommend designing the waterfall proportionate to the flow rate of your pumping system. Generally speaking, for optimal filtration it’s good to pump the entire contents of your pond at least every hour. That means if you have a 3,000-gallon pond, for the sake of good filtration, you should aim for a minimum of 3000 gallons per hour. Therefore, a waterfall designed for 3000 gph makes sense. Of course, you can always make it bigger if you like, but keep in mind that this will also require a bigger skimmer, pump and/or filter.
Even if you know your waterfall will flow at 3000 gph, it can be difficult to visualize just how large that is. As a reference, a standard garden hose will put out between 600 and 800 gph, depending on the water pressure of your location. So a 3000 gph waterfall would be about 3 to 4 garden hoses’ worth of water.
Recommended Waterfall Sizes
We recommend 100 gph per inch of waterfall spillways as a minimum for a nice waterfall. Using those numbers, for a 19” wide waterfall spillway, we’d recommend a minimum of 1900 gph. Although it’s possible to go less than that for a more tranquil design, 100 gph per inch of spillway is a good starting point. You could double that up to 200 gph per inch of spillway for a waterfall with more punch.
For very small ponds in the 500 to 1500 gallon range, we usually recommend pumping a minimum of about 1600 gph for the sake of the waterfall, even though the pond is quite small. The main reason for this is the waterfall width. The smallest waterfall filter we carry is 16” wide. Using the 100 gph per inch of waterfall spillway metric, we would want a minimum of 1600 gph, even though the pond is only 500 to 1500 gallons.

Waterfall Filters
If you want to make it easy on yourself, use a waterfall filter as the base for building the waterfall. Waterfall filters come with a pre-built spillway that you can camouflage with rocks. Their specs will provide a recommended flow range. For example, the Atlantic BF1900 FilterFalls has a 19” waterfall spillway and the specs state it can handle between 2500 gph and 4000 gph for proper filtration. If you use our 100-gph-per-inch rule above, however, you could likely get away with as little as 1900 gph on this filter.
Designing a Natural Waterfall
There are a couple tricks we like to use when building a waterfall to make it look more natural:
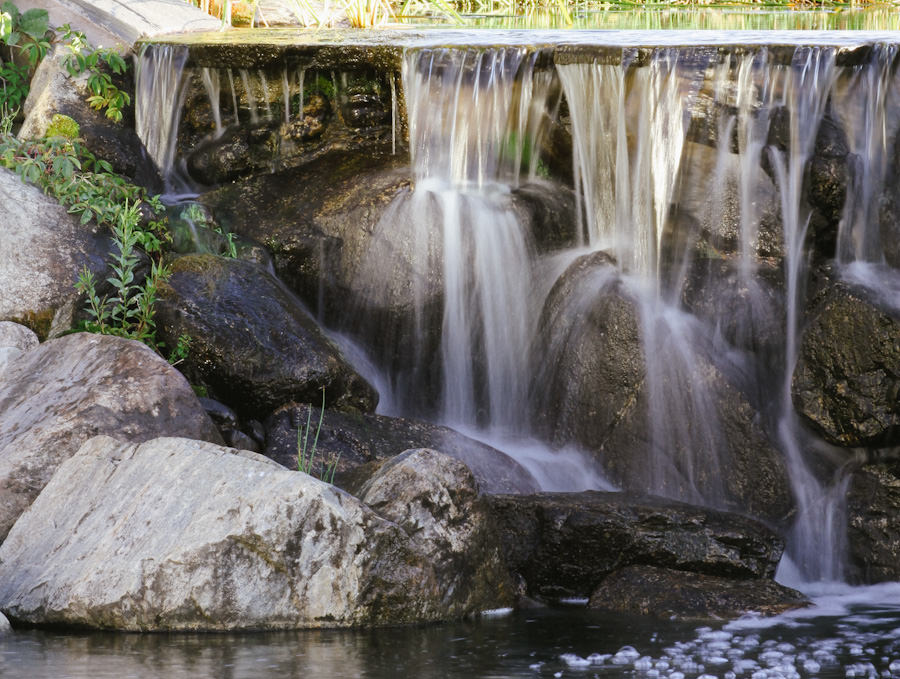
- Use large rocks. In nature, a river or stream will clear out small pebbles and stones over time, leaving behind the larger stones and boulders. These larger stones often form the basis for waterfalls. The water is routed and diverted around the larger boulders, causing cascades of water to fall. In most cases, without large boulders, there simply wouldn’t be a waterfall! Because of this, manmade waterfalls made of small rocks or pebbles just don’t look natural. To see more about actual construction techniques, please have a look at the building chapter.
- Blend the waterfall into the landscape. In nature, a waterfall is often part of an overall theme in the landscape. For example, if there’s a 10-foot-high waterfall in a river, often the surrounding terrain will reflect this 10 foot drop as well, in the form of a cliff, a grade change, or at least a hill. In this same way, you’ll want to try to blend your waterfall into the landscape. You can do this by building up the area around the waterfall with soil and rock, and then slowly fading the elevation back down to the normal grade level. If you don’t blend the waterfall into the surroundings, your waterfall might end up looking a bit “volcano style.” Wondering what volcano style is? Well, it’s exactly what it sounds like: an abrupt mound of rock in the middle of a flat landscape. It definitely doesn’t look natural!
- Use a waterfall filter to make your life easier. A waterfall filter is a great way to combine biological filtration and a waterfall spillway into one unit. Not only does a waterfall filter conceal the biological filter in the landscape, but it also acts as a great base for creating a pool of water at the top of the falls with no extra liner needed. A very important part of installing a waterfall filter, however, is remembering to disguise it properly. A properly installed waterfall filter should be invisible and hidden with rocks. We’ll get more into the details of this in the building chapter.
Designing a Waterfall for a Formal Water Garden
If you’re building a formal-style water garden instead, then the goal isn’t to make the waterfall look natural. In this case, something like the Atlantic Colorfalls could be a great option. The Colorfalls helps create a clean, simple waterfall that can come out of some rocks or a retaining wall of some kind:
Atlantic Colorfalls: https://www.everything-ponds.com/atlantic-colorfalls.html
<< prev: 1.5 Choosing a Size and Depth : next: 1.7 Water Garden Shelves and Plants >>
Need help choosing pond equipment?